Virtual PC - Wintel
(Windows)
emulation on a Mac
[
Tips] [
Dos apps] [
D: (data) drive] [
Z: (mac) drive]
[
Crash recovery] [
Speeding up VPC]
Virtual PC runs under the Mac OS X
operating system and allows you to create a virtual Windows PC that
uses most of the Mac's hardware. Don't expect anywhere near the
performance of a dedicated, modern Windows PC but you should be able to
run a wide a variety of Windows programs, including MS Access (which is
not available for OS X). Video intensive apps (eg games) and USB
hardware are likely to cause heartache!
Tips (these apply to VPC6 but most should work
with VPC7)
- Upgrading from VPC6.1 to VPC7
on a G5 Mac: From VPC 6.1 disk one, copy "windows xp professional.zip"
to
your hard drive. Double click to open the archive. It will then create
a file called " windows xp professional. vpd". Now launch VPC 7 from
your hard drive. Select "new." Select the last option "import from a
previous version." When the dialog box launches locate "windows xp
professional.vpd" on your hard drive. Select it. Now it is going to
give some ridiculous warning about overwriting. Tell it okay. It should
start loading Windows. (thanks Jennifer)
- List
of USB devices that are known to work or not work with VPC (thanks
Steve Jain)
- DNS
Error in IE using VPC 7.01 - discussion (thanks Scott)
- Configuring VPC for multiple users (thanks Paul Power)
- Installing
Quickbooks in VPC (thanks Broussaj)
- Preventing OS X from automatically opening an EXE file with
VPC (such files might have viruses):
- 1. Use Text Editor to create a junk file (say junk.rtf) in
your root directory (Macintosh HD)
2. With Finder, change the extension from RTF to EXE - confirm the
warning message about changing file extensions (the default is no
change). It should now be JUNK.EXE
2. With Finder, click on the file and press Command-I (or File/Get
Info)
3. Click on the Open With triangle. It will probably show VPC as the
default application.
4. Select another application from the drop-down list (I used Text
Editor)
5. Click "Change All"
That's it. Now I think that because the junk file was in the root
directory all EXE files on that hard drive will now have Text Editor as
the default application. To check this using Finder, go to a folder
that has an EXE file, Control-Click on the file and look at the Open
With item. It should now show Text Editor as the default instead of
VPC.
You can do the same with PDFs that seems to get stored with Acrobat
Reader as the default application rather than Preview.
- Palm PDAs - Sync to Windows in Virtual PC using Bluetooth - TJL
- XPlite and
2000lite are powerful configuration utilities for Windows creating a
modular Windows operating system where YOU are in control.
512MB is not enough for run OS X and VPC with XP effectively.  You
should have at least 512MB for OS and 256MB for VPC.  I'd recommend
upgrading to 1GB.  This will help both OS X and VPC run better.
However, you should leave VPC's memory setting to 256MB, upping it
will degrade performance.  If you find you are running out of RAM in
VPC, then you could increase it.

Another big factor in VPC performance is bus speed and disk speed.
And, IIRC, iBooks generally have the lowest speed for both of these
and this is a big hit on VPC.  You could try moving your Windows VM to
an external hard drive, preferably one with a 7200rpm or higher speed.

Once you have copied the VM file (eg Windows XP Professional.vpc7) to the
external hard drive make an alias to it in your VPC List folder. To do
this using Finder, hold down Option-Command and drag the file's icon to
<user>:DOCUMENTS:Virtual PC List
- Speed up VPC6 by disabling the processor MMX support. In the
VPC 6.1.1 Preferences, choose to show the Scripts in the Menu. Then in
the Scripts Menu choose the Toggle MMX Setting and DISABLE MMX - tip
from MSN
newsgroup (avlaw).
- Norton Anti-virus for Mac can slow
things down if set to Autoprotect.
Creating a d: drive on a
Virtual PC.
Keep your c: drive
reserved for
configured programs and the Windows system. Create a d: drive to store
all your data. In this way you can quickly recover from a
serious
Windows crash by restoring the VPC file for the c: drive (see tip
above). Your precious data will still be there in the d: drive VPC file
(which should also be backed up, of course).
Use Virtual Disk Assistant to
create a new drive image for this purpose The Virtual Disk
Assistant can be selected from the Windows menu of the VPC menu bar
under OS X. This is used to create a new hard disk image ('Create new
floppy or hard disk image'). As an alternative, you might be able to use an "old" image
file such as from a previous version of VPC.
Once this is done go to your VPC List
and select (click once) your
Windows (c:) drive. Click Settings and then click Drive 2. Now select
your newly created drive from the drop down list. This will become your
d: drive.
It is a good idea to back-up this
image file regularly if it contains
important data. It should be in <home>:Documents:Virtual-PC-List
as a *.vhdp file. While you are at it, back up the *.vpc6 file (which
should be your c: drive image).
With VPC6 you can access the contents of your d: drive image file
directly from OS X. Just double click on the file from Finder and it
will mount the volume on the desktop. This can then be browsed and
managed with Finder.
One
advantage of storing your important data in a d: drive (rather than the
c: drive) is that it can be copied to any other Mac (OS X) and accessed
from VPC6
on that machine. It is unlikely that you could do this with the c:
drive image (since it is hardware dependent).
Creating a z: drive to access
Mac files from VPC
From your VPC List select (click once)
your
Windows (c:) drive. Click Settings then select Shared Folders. Make
sure Local Volumes is checked and click OK (ignore the status line 'Not
installed'). Start VPC. If VPC Additions is installed then your Mac
drive should appear as the Z: drive. Otherwise you will need to install
it. Just click on the jigsaw icon at the foot of the VPC window to
start the installation process.
Note that I find use of the z: drive slows things down considerably. I
often work on data on the d: drive and copy it over to the z: drive at
the end of processing.
- VPC won't boot up to Windows? Easy -
just restore your back-up of the *.vpc6 file (see above)!
- Don't have a back-up? Uh-ooh! Try this tip from Bob from the VPC
newsgroup:
"Search the Microsoft Knowledge Base
for file 825413.
www.support.microsoft.com
I used the new saved hard drive document and created a new pc with it.
Open Virtual PC and in your Virtual PC list, click "new" then "create a
PC manually". In the next window "select a hard drive data source"
choose "use an existing Virtual Hard Drive Document" and select the
saved document that you created. This created a new PC that appears in
your Virtual PC list with all the
files intact from the corrupted PC that wouldn't start. I'm no expert
so you might want to get a second opinion on this crazy
solution, but it worked for me."
Bob
- Error message "The PC
could not be restored because one of the hard
disk images has been modified since the PC was saved." ? Quit
out of
VPC altogether. On the Mac side, open the Virtual PC List folder in
your Documents folder. Control-Click on Windows and select 'Show
package Contents'. You should find a file there called 'savedstate'. If
so, delete it. You should now be able to start Windows. Thanks Paul
Power.
- See also these hard disk tips.
- If your Windows software is happy accessing data on the shared (Mac/Z) drive and speed is acceptable then
use that shared drive. Otherwise consider creating a virtual
(eg "d") drive for data storage but ensure it is frequently backed
up. If a virtual drive becomes inaccessible (ie due to the inevitable
VPC crash) try unmounting it from the PC Settings for the Virtual
Machine (Drive 2 >> none). Then its contents should be accessible
from OS X Finder.
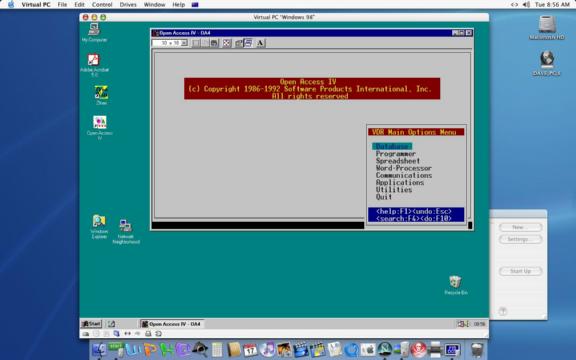
Running DOS apps
under OS X & alternatives to VPC
- Dosbox
for Mac OS X should have the latest release of Dosbox (Version 0.61
that came with Radnor had a co-processor bug that was evident using OA
Calculator). Here is some Applescript
to launch Open
Access within Dosbox:
do
shell script
"/path1/DosBox.App/Contents/MacOS/DosBox
/path2/oa4.bat"
where the path1 is to the Dosbox
app and path2 is to the directory containing the OA4 code or
- in this case - a batch file to start it up. Note that path2 becomes
the root of the c: drive.
Disclaimer: These tips are really my record of ways to do things on the
Mac and might not be suitable for your system. If they work for you -
great. Backup your data regularly, particularly before trying any
major changes to the system.
